DIY Mid-Century Modern Table Making Made Easy
Sep 27, 2016
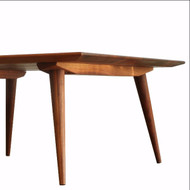
Mid-Century Modern (MCM) furniture designers are renowned for creating appealing tables that masterfully ‘float’ wooden table tops above minimalist table bases. The best of these designers achieved this new look using the subtractive principles of modern minimalism. Although they were intent upon reducing the visual bulk of traditional table bases, they still had to make rugged leg attachments and keep the table top boards from warping.
Their ‘less is more’ solution to this paradox was to use wooden cleats to simultaneously support the table top above while receiving the legs from below. These cleats completely eliminated the need for table aprons. With just two cleats and four slim table legs, DIY mid century modern furniture appears supremely lighter than their traditional antecedents.
The problem for do-it-yourselfers.
Belying their simple appearance, these cleat systems actually feature unusual angles that are hard to get ‘just right.’ Until now, the D.I.Y.er has had few ways to mend or make mid-century modern tables. Light-duty metal hardware is one way, and we sell a lot of it.
But, these metal plates become inadequate as the table gets bigger. For a DIY mid century modern dining table, this metal hardware can be downright dangerous. Plus, it plays no part in keeping the table top flat. That’s a problem.
Metal plates do nothing to keep the tabletop supported and flat.
The TableLegs.com Solution
For the first time ever, you can now get ready-made cleats, specially designed for easy DIY mid-century modern furniture plans. These tips can be easily applied to DIY modern dining tables, desks, end tables, credenzas, side tables, sofas and more. Here’s what you need to know.
These hardwood cleats are intended to show! An understated but essential element in the design of a modern table, these hardwood cleats feature crisply drilled mounting holes, delicate edge chamfers and fine sanding. They are beautifully sculptural in their own right!
What are cleats? Cleats fasten underneath the table top with wood screws (included). McCobb or Wegner modern tapered legs can be ordered with pre-installed industrial strength hardware so you can fasten legs to the cleats, without tools, in a jiffy.
There are three kinds of cleats. The angled cleat and the straight cleat are designed to have legs attached to them. This makes a cleat/leg assembly, with two legs, one at each end of the central cleat.
The flattener cleat is used to eliminate warping of table top boards, hence the term ‘flattener’ cleat. It’s great for use with hairpin legs, and for giving strength to long tables.
Number of cleats needed. You will want one cleat for every two legs. A four-legged table needs two cleats. A six-legged table needs three leg cleats. On any table, once the distance between cleat/leg assemblies reaches over 30 inches, consider adding a flattener cleat for additional strengthening and flattening of the tabletop.
Length of cleat. There are seven available cleat lengths. Choose a cleat length about six inches shorter than your dining table top is wide, or about four inches shorter than your side/coffee table is wide. (Cleats run perpendicular to tabletop board direction).
Angled leg cleats are just visible above the two front McCobb legs of this small maple dining table. Legs socket securely into the wood cleats.
Locating the Cleats on Your Table Top.
First, remember that cleats are mounted to the underside of the table top, in a direction that is perpendicular to the direction of the tabletop boards. Cleats are centered across the width of the table, meaning that there is an equal amount of space at either end of the cleat out to the edge of the table. For hairpin leg tables, we like to place the flattener cleats just inside the location of the hairpin leg base plates.
For cleat/leg assemblies on small tables we like setting the outer long edge of the cleat in four inches from the end of the table. On larger tables we might set the long edge of the cleat in six inches from the end of the table.
These are just suggestions, and the cleats are easy to mount and demount. To use your own aesthetic judgment, try repositioning the cleat/leg assemblies. This is easily done with your top upside down, and the legs attached to the cleat.
Simply reposition the assemblies until things look right to you, attach with 2 screws, flip the table over, and evaluate. When you achieve the look that is right for you, finish attaching the cleat.
A Note on Tabletops.
To minimize warping and cupping of table top boards, apply finish to your top as soon as possible. Finishing your top will slow down the rate at which the lumber reacts to change in humidity, the most common cause of warping. Put the same number of coats of finish on the bottom of your top as you do on the top.
Allow air to circulate evenly on all surfaces. Always stabilize your top by using aprons or cleats. Design your own solid wood table top to complement your unique design.. If you order a table top from us, we will install the cleats for you if you wish. Just ask for details.
Creating these seemingly simple cleats took a great deal of research on 1950s era furniture. We spent countless hours in antique shops specializing in the retro look. The more time we put into this journey, the more we became inspired by the thousands of examples, good and bad, of the period. With these cleats, a table top, four diy mid century modern table legs, and just a little determination – you too can join the ranks of the Mid Century Modern Furniture Masters!
Check out all our table leg attachment systems

