
How to Make Table Legs from Wood
I'm Matt Burak, a Vermont furniture maker/designer, and I’d like to share with you what I’ve learned over the past 40 years about making wooden table legs. I'm the founder and owner of TableLegs.com, a company that specializes in turned parts with a large emphasis on table legs.
Obviously, a table leg is the vertical component of a table that supports the tabletop. Shorter versions that support furniture such as sofas and entertainment centers are commonly referred to as furniture feet, and range in height from 4” to 12”. Common Table leg heights are 14” to 18” for coffee table legs, 20” to 24” for end table legs, 28” to 29” for dining table legs, and 35.5 to 42” for Kitchen island legs. The deciding factor on leg height will be the function the table is designed for. Table legs can be as simple as a branch of a tree (as in Adirondack furniture), a 2x4 or metal tube cut to the appropriate length, or complex such as ornately turned legs, or shaped Country Cabriole legs.
Once function/length are established design and size come next. Design is dictated by personal taste and the design motif of the space. Size is more about balance and proportion. My advice is, trust your eye not your tape measure. Find examples that are pleasing to the eye and measure them. Looking at incremental measurements on your tape measure often leads to the choice of too large a leg.
The piece of wood a leg is made from is referred to as a wood turning blank or square and can be either solid or laminated. Solid squares have no glue lines and are sawn from a log in the square, dried, defected, and then finish milled to size or milled out of thick planks. Laminated squares are created by gluing multiple pieces of wood together. Turning squares for larger legs often must be laminated. The more care taken to grain and color match when laminating the higher quality legs, you will produce.
How to Make Square Table Legs
Let’s start with the simplest form, a square table leg which could be something you create in your shop or buy at your local lumber store and cut to the appropriate length. Along with length your other considerations are the species, the diameter (1 ½” x 1 ½” up to 6”x6” or larger), and the edge treatment. To make a square table leg, follow these steps:
Decide On The Type Of Wood You Will Use
Decide on the type of wood you will use and purchase or make your leg blanks. For best results each leg blank needs to be square, straight, defect free, and be well color and grain matched.
Choose An Edge Detail
For a crisp look break the edge with sandpaper. For a more defined edge use a 45-degree router bit or block plane to create a chamfered edge. The addition of a radiused (rounded) edge adds a modern or contemporary look and can be achieved with a router and a round over bit.
Edge The Bottom Of Your Feet
Using the same detail on the 4 bottom edges of your leg gives it a finished look at the floor and protects the leg from chipping as it’s slid across the floor.
Final Sanding
Sand out all milling marks, scratches, transition marks from the manufacturing process.
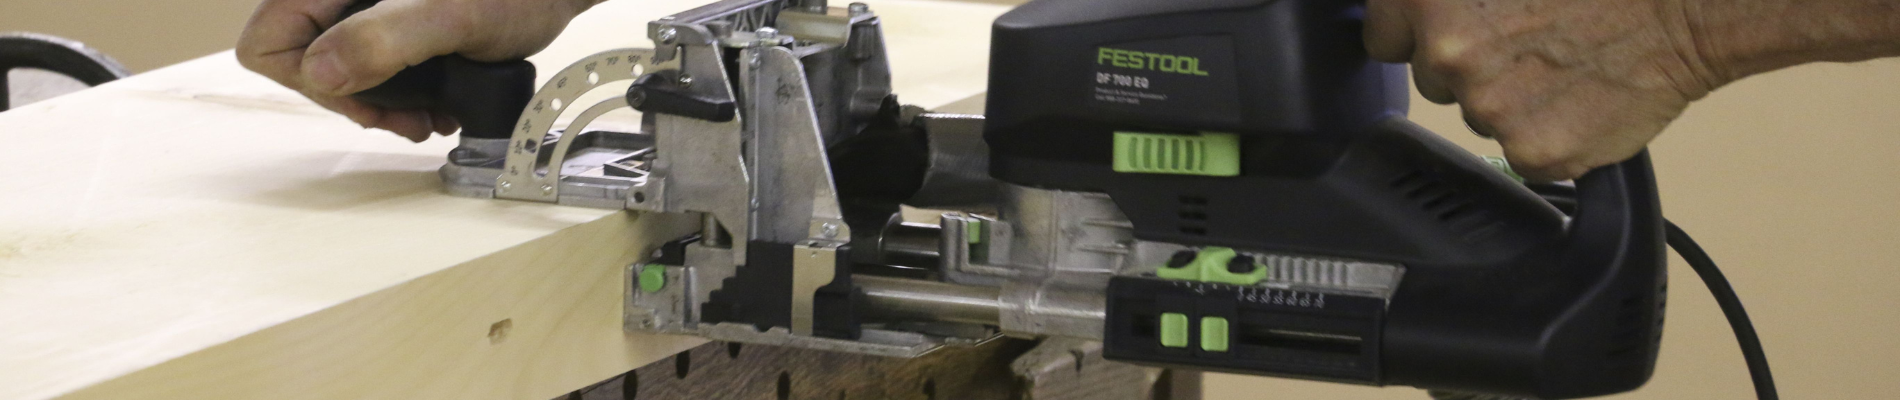
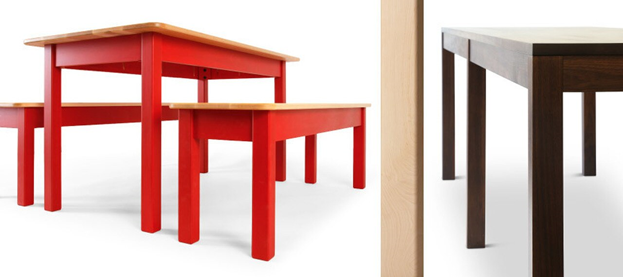
2 and 4-Sided Tapered Table Legs Tapered table legs with their clean lines are the simplest leg form that, like more complex legs, reflects the natural symmetry found on legs in the natural world. The taper can begin at the top of the leg or a point down from the top of the leg. Where you start the taper is influenced by your table’s design which in turn dictates how the legs will be affixed to the top. Attachment systems for legs to tops will be covered in detail in an upcoming article. It is important to note at this point that a table apron is the component that connects 2 legs together and an apron block refers to the square upper portion of a table leg where the aprons are joined to the legs.
Typically legs that are tapered the full length don't have aprons and attach to the top by some other means. The two sided tapered table leg has been around since the 1700s. It's often referred to as the Hepplewhite leg which was designed and made popular in that neoclassic period by George Hepplewhite and thus its name. The same form was adopted in the 1800’s by the Shakers a religious sect known for their well-crafted but austere furniture designs. It’s not uncommon to have this leg referred to as a Shaker leg.
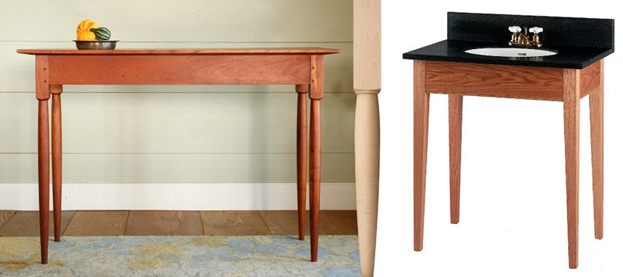
In the 1940’s during the mid-century modern period the two-side tapered leg with radius corners was popularized by the Danish Modern Furniture movement. We named our version the Juhl leg in honor of the well-known Mid-Century Furniture designer Finn Juhl. The four-side tapered table leg has all four sides tapered and has a more contemporary feel. The edge detailing options are the same as the 2-sided version.
How to Make Tapered Table Legs
To make a 2-sided tapered table leg, follow these steps. Making a 4-side tapered table leg requires repeating steps 2,3 & 4. Use the rough cut 2 side tapered leg to establish the location of the cleats on the 2nd jig.
- Decide on the type of wood you will use and purchase or make your leg blanks. For best results each leg blank needs to be square, straight, defect free, and be well color and grain matched
- First you need to draw layout lines on your leg blank that represent the finished leg. There are numerous ways to make tapered wooden table legs with a simple fixture/jig and a band saw. Using a table saw is an option but personally I consider it just too dangerous.
- Start by cutting a piece of plywood 8 to 10” wide with your band saw. It should be a few inches longer than your leg. Leave the saw fence at this setting.
- Position your table leg blank on the jig with the portion to be removed hanging off the edge cut by the band saw. Mark the jig with the leg blanks position.
- Remove the blank and glue or screw positioning cleats on the long edge and at the end towards you.
- Now simply place the leg blank on the jig and pass it by the blade. Rotate your blank ¼ turn and pass it by the blade to finish sawing out your leg.
- Removing the band saw marks can be done on a jointer, with a belt sander or edge sander, or a hand plane.
- Choose an edge detail. For a crisp look break the edge with sandpaper. For a more defined edge use a 45-degree router bit or block plane to create a chamfered edge. The addition of a radiused (rounded) edge adds a modern or contemporary look and can be achieved with a router and a round over bit.
- Edge the bottom of your feet. Using the same detail on the 4 bottom edges of your leg gives it a finished look at the floor and protects the leg from chipping as it’s slid across the floor.
- Final sanding. Sand out all milling marks, scratches, transition marks from the manufacturing process.
How Round Table Legs Are Made
Most people are familiar with a hand lathes where a turning blank is spun between 2 spur center and shaped with handheld chisels. This is the way round table legs have been made for hundreds of years. Hand turning is an area of woodworking that's quite specialized. Craftsmen who do it every day are highly skilled and spend years learning their craft. To become a proficient hand turner, plan on investing in the right equipment and most importantly investing time, preferably with some training from a skilled hand turner. Wood turning is not something that you just do occasionally. It is a skillset you must practice regularly to stay efficient. If what you really want is to build a nice table, it's probably best to order premade table legs. Premade turned parts can often be ordered with modifications such as mortising, splitting, notching. It’s also possible to order the legs with aprons and other attachment systems if you don’t have the equipment or skills to create them yourself.
How Round Table Legs Are Made Commercially
In the world of commercial wood turning, table legs, columns, or any round parts in general are manufactured using several different technologies. The most advanced technology is with a CNC (computer numerically controlled) lathe. At tablegs.com we have several CNC lathes of various sizes. Digital drawings converted into programs are downloaded to the lathes control center. The appropriate turning square spinning at high speed is then shaped by various tools into an exact replica of the drawn art. The investment for this kind of technology can exceed $250,000. The upside of CNC technology is the minimal set up time required between style changes, and the unlimited number of digitized designs that can be stored. The downside of this technology is the upfront expense, and that it’s inefficient when used to run large quantities of identical parts.
An older but very efficient technology is the Madison Rotary Lathe. Madison lathes came into use in the 1940’s. Although referred to as lathe, I think of them more as a horizontal shaper. Like a shaper tooling with the required profile is slid onto an arbor (shaft) which on a Madison lathe is in the horizontal plane about 3” in diameter and can be up to 48” long. When running the tooling spins at very high RPM (revolutions per minute). An arbor fully loaded with tooling can weigh several hundred pounds. Changing out tooling takes a highly skilled technician and several hours. The vibration from improperly installed tooling can literally walk a machine weighing several thousand pounds across the shop floor. Obeying all safety procedures is critical. Picture a whirring blender on steroids.
Like a hand lathe, you chuck up a turning blank between two center points that slowly rotates the blank. The blank is then slowly indexed into the rapidly turning tooling. Once the stop point is reached and the blank has made 1 full revolution you have a fully formed leg ready for sanding.
Another attribute that sets the Madison lathe apart from all others is its ability to create faceted turnings the most common being square (4 sided turnings).
No machine is more efficient at running hundreds of the same parts. The downside for the Madison lathe is long set up times, long apprenticeship periods for the operators, safety issues, and the cost of tooling. Building and maintaining the tooling takes another highly skilled craftsman. Currently, I know of only one company in the US that makes heads for Madison lathes. Madison lathes have been and still are the backbone for commercial applications where thousands of the same parts are required.
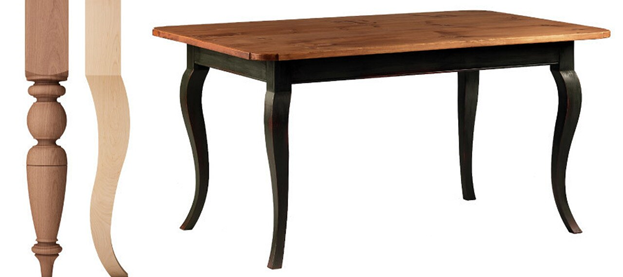
Carved and Shaped Table Legs
Moving on from the legs that are more linear, such as the Foursquare, tapered and turned legs, you get into legs that are shaped or carved. It’s not uncommon for legs of this type to require shaping, carving, multiple machines, complex fixturing, and multiple processes. French and Cabriole table legs are historic styles in this genre. From the Arts and Crafts, Art Deco, and Mid-Century Modern periods forward unending examples abound.
After decades studding everything table leg I’m still often captivated by a new design. Recently in the lobby of a hotel I bent over to study an antique leg. To my surprise when I turned around there was a collection of people bent over trying to find out what so fascinated me. Startled I felt the need to explain. Isn’t that table leg gorgeous!!
Hoping this opens a new avenue to exploring the always amazing creativity that lives within you.
MATTHEW
